Monitoring Windows Host-based firewall
Host-based firewalls are a great way to monitor any strange connections that might be sourcing from your system, or if there’s any unexpected internal connections within your network.
Windows offers the Audit filtering platform connection which you may setup as an alternative to this; however, for this article we’ll be reading the Windows Firewall Log file. (Note: This use-case can apply to any other applications that generates .log files).
We will be performing the following:
1: Enabling Logging for Windows Firewall
2: Setting up Filebeat to read the Firewall Events and send them to Logstash
3: Logstash Configuration with GROK pattern
Enabling Windows Firewall Logging
- Navigate to Windows Firewall with Advanced Security
- Right-click “Windows Firewall With advance Security On Local Computer” and select “Properties“
- Under Public Profile | Private Profile| Domain Profile click on Customize

- Set Log Dropped Packets and Log Successful connections to: YES, You may also increase the file size if necessary.
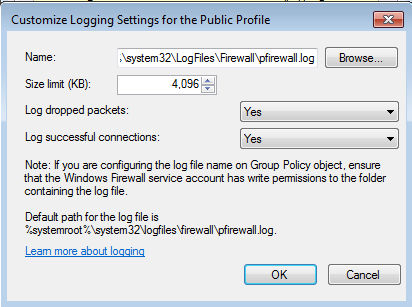
Click OKYour endpoint will start writing Firewall logs to the following path C:\Windows\System32\LogFiles\Firewall\pfirewall.log
Setting up Filebeat
Now that Windows Firewall events are being logged it’s time to forward them to Elasticsearch so we can visualize them in Kibana and make some meaningful decisions based on the data.
Prerequisites:
- Filebeat – Download here (64-bit Windows)
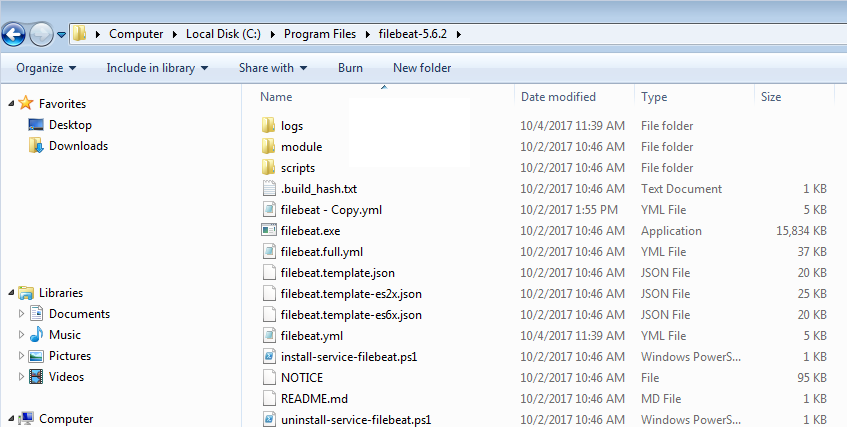
Step 1: Download and extract filebeat-5.6.2-windows-x86_64.zip to c:\program files\ (Should look like the image below)
Step 2: Open the filebeat.yml and edit with notepad:
We will add the following under filebeat.prospectors:
filebeat.prospectors:
- input_type: log
 paths:
 - C:\Windows\System32\LogFiles\Firewall\*.log
 document_type: windowsfirewall
 fields:
 logtype: windowsfirewall
Note: Looks like document_type is Deprecated, but the configuration above still works.
Next, scroll down until you get to output: here you will add your logstash server information
“LogstashIPaddress:Port#”
output:
 logstash:
 hosts: ["LogstashserverIP:5075"]
Save the filebeat.yml and exit.
Step 3: Install Filebeat as a service
Launch Powershell (Run as Administrator) – and enter the following:
cd "c:\Program Files\filebeat-5.6.2"
powershell.exe -ExecutionPolicy UnRestricted -File .\install-service-filebeat.ps1
Start-Service filebeat

Note: If you get a security warning just hit the “R” key to Run once.
Verify that the service is running.
Logstash Configuration with Grok Pattern
As mentioned earlier, a Windows Firewall log will be written to C:\Windows\System32\LogFiles\Firewall\pfirewall.log. Unfortunatley, the formatting is horrible as you can see below which is meaningless if we send it to elasticsearch.

How do we resolve this? Grok Patterns!
Grok is a great way to parse unstructured log data into something structured and “queryable”. This tool is perfect for syslog logs, or any log format that is generally written for humans and not computer consumption.
Fortunately for us, Logstash already ships with the GROK plugin so we can write whatever Grok patterns we want.
This is the GROK pattern I came up with to make our Windows Firewall Log file:
“%{GREEDYDATA:Date} %{GREEDYDATA:Time} %{WORD:action} %{WORD:protocol} %{IP:source_ip} %{IP:destination_ip} %{INT:SrcPort} %{INT:DstPort} %{INT:Size} %{GREEDYDATA:Size}”
Here’s the logstash configuration. Save it as WindowsFirewall.conf
#Windows Firewall Input - Logstash Configuration - Pablo Delgado
input {
  beats {
    port => 5075
  }
}


filter {
 if [type] == "windowsfirewall" {
 grok {
# match log structure using grok
 match => { "message" => "%{GREEDYDATA:Date} %{GREEDYDATA:Time} %{WORD:action} %{WORD:protocol} %{IP:source_ip} %{IP:destination_ip} %{INT:SrcPort} %{INT:DstPort} %{INT:Size} %{GREEDYDATA:Size}" }
 }
 }
}


output {
if [type] == "windowsfirewall"  {
  elasticsearch {
     hosts => ["http://elasticsearchserver:9200"]
     index => "logstash-windowsfirewall%{+YYYY.MM.dd}"
     }
   }
 }
Save it to your Logtash configuration folder and restart logstash.
Quick Scenario
Here’s an example of a logged connection:
I’m connecting to a server via SSH (Putty).
My system: 192.168.1.20 to 192.168.1.30 on Port 22
Here’s the raw logs:
![]()
After Logbeat sends this raw log to Logstash, Logstash will ingest the log and will apply the GROK pattern that I created and will create the appropriate fields in Elasticsearch.
This is how my log will look like in Kibana which is now searchable!

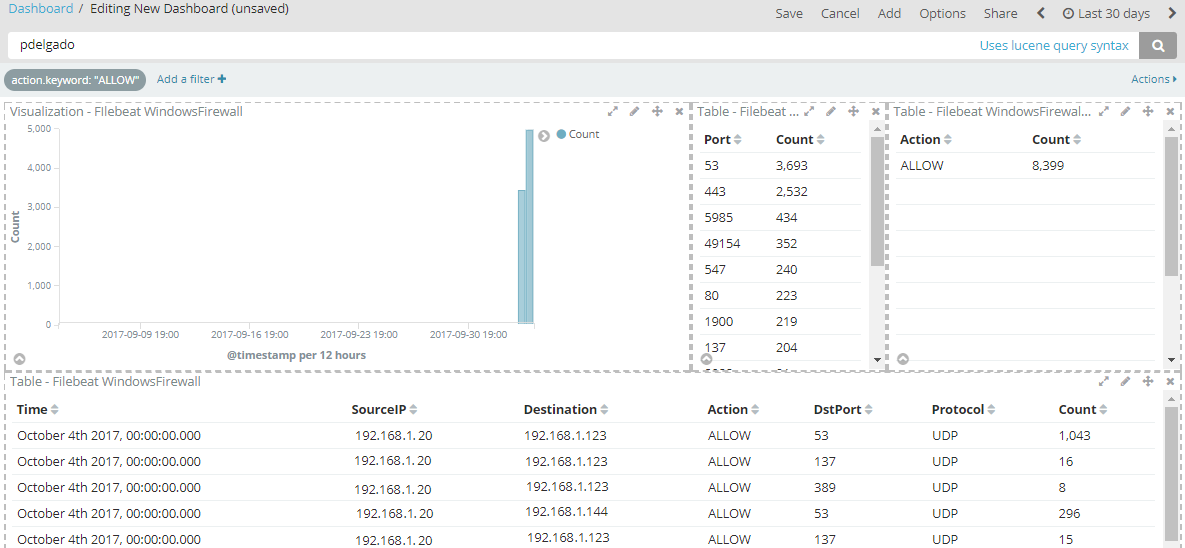
Here’s a sample of a dashboard that you can create for easier filtering:
Conclusion
As you can see, enabling our host-based firewalls can provide us with more endpoint visibility to possibly spot any anomalous connections which we’re not expecting. You may then create meaningful dashboards in Kibana to help you filter by Blocked connections or specific port or protocols.
Again let me know if you have any questions!
Highly recommended that you do not use multiple GREEDYDATA grabs, absolutely none is best case. There are so many choices in grok that GREEDYDATA just appears to be a lazy approach to gathering hard to configure layouts. Grok also respects REGEX, so you are certain to find a way around using GREEDY grabs. %{NOTSPACE} and REGEX are my go-to’s
Thanks for the great info. This is a more specific Grok pattern I ended up with for the log entries:
%{TIMESTAMP_ISO8601:TimeStamp} %{WORD:Action} %{WORD:Prot} %{IP:SrcIP} %{IP:DstIP} %{INT:SrcPort} %{INT:DstPort} %{INT:Size} %{GREEDYDATA:Flags} %{WORD:Path}